I started to connect various electronic devices to Alexa like lamps, switches, coffee machine but each time it has been with domotic objects that already had Alexa included. I just moved in a new house and when I found my old Raspberry Pi 2 in a box an idea occurred to me: what if my Raspberry could integrate my Alexa automation environment? So, I started my new project: how Alexa could control my old not-connected TV thanks to my Raspberry Pi and an infrared emitter!
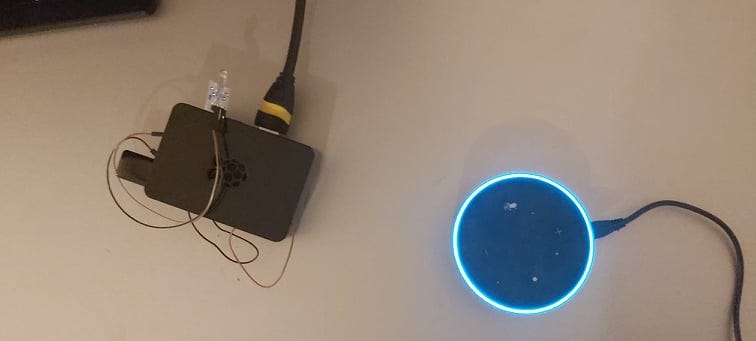
See below the overview of my actual project implementation:

This article will give you some tips to implement it in 3 parts:
-
- How to control a television with an Infrared (IR) emitter connected to the Raspberry with Lirc
-
- How to create some Alexa intents to control the Raspberry in the Alexa Skill Developer Kit
-
- How to link Alexa cloud with our Raspberry Node.js server
Materials needed
- At least one Alexa connected to your internal wifi
- x1 Raspberry Pi or similar (here, I use and explain for Raspberry Pi 2 but can be adapted easily to other versions)
- x1 IR Transmitter module (in my case, I use Whadda WPM316 for Arduino)
- x2 GPIO Cable (female/female)
- Television (and its TV remote if you need to record each key)
Control my television with IR emitter and Lirc
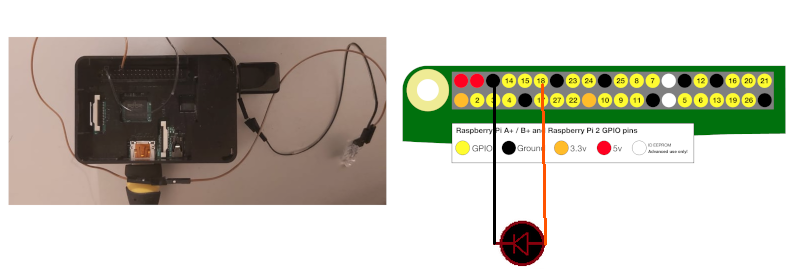
The first thing to do is to connect your IR LED. I choose to connect to pin 18.
The second step is to install Lirc, the IR driver for Linux.
sudo apt-get install lircHere is my configuration. First, edit /etc/lirc/lirc_options.conf as follows:
driver          = default
device          = /dev/lirc0
Then, edit the /boot/config.txt and uncomment (or add if not in the file) this line:
dtoverlay=gpio-ir-tx,gpio_pin=18In case you also need an IR receiver to record remote keys, uncomment:
dtoverlay=gpio-ir,gpio_pin=17Personally, my usage was to reproduce the Samsung TV Remote. You can easily find most remotes using the following keyword in Github or in your search engine:
lircd.conf <name of your remote device>lircd.conf is the file in /etc/lirc that contains all IR mappings. If you can’t find the right file, plug a receiver on your Raspberry, and Lirc can record your remote presses and generate your own lircd.conf thanks to the irrecord command.
# Restart lirc
sudo service lircd restart
# Send one press to power on or power off my TV:
irsend SEND_ONCE SAMSUNG_AA59-00600A_POWER KEY_POWER
# Send a press for another key:
irsend SEND_ONCE SAMSUNG_AA59-00600A KEY_VOLUMEUP
Tip: to know if something is sent on your IR emitter, open your phone camera app. Switch off the light and point the camera toward the emitter. If you see the IR light blinking, it’s working — IR are visible from phone cameras thanks to the camera filter!

Prepare my Raspberry to Alexa with Node.js Express server
One of the solutions I found was to create a Node.js REST API exposed on the web. Alexa can only use public APIs.
Here is my solution — a Node/Express API exposes the following REST route:
GET on https://<myHostAddress>/:commandCommand is the key exposed in the lircd.conf. Then, I used the exec lib to execute this bash command:
irsend SEND_ONCE <remote name in lircd.conf> <chosen command like KEY_VOLUMEUP>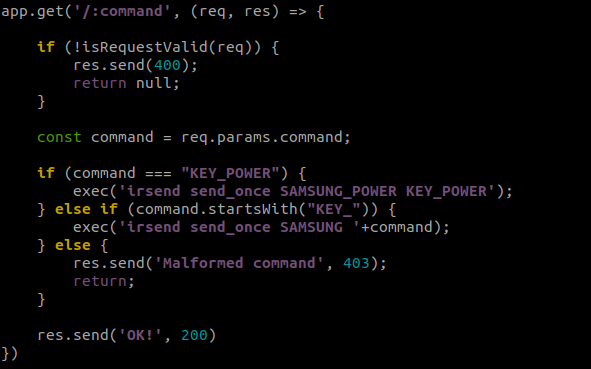
For my first increment, I used ngrok to deploy a public HTTPS server quickly. HTTPS is required for Lambda fetch.
To automatically run your Node.js server on Raspberry startup, I recommend using PM2:
npm install pm2 -g
# Go to your server folder
pm2 start app.js
Create your first Alexa Skill Intent

You will need to use or create an Amazon account and go to the Alexa Skill Builder. Then, create a new skill with the following configuration: “custom” with “Alexa-hosted nodejs lambda” and “Start from scratch”.
I chose the following sentence to launch my Skill:
“Alexa, ask my television to <do something>”
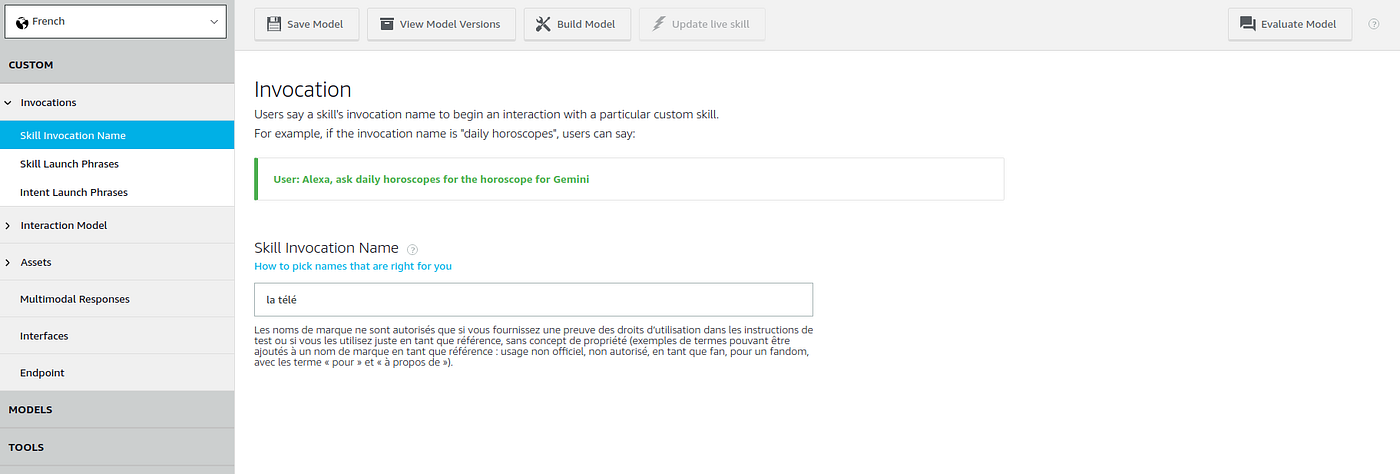
The first thing to configure is “my television”. Go to Invocation => Skill invocation name.
The second thing is the <do something>. For Alexa, it’s named intent. An intent is a combination of fixed words and slot types.
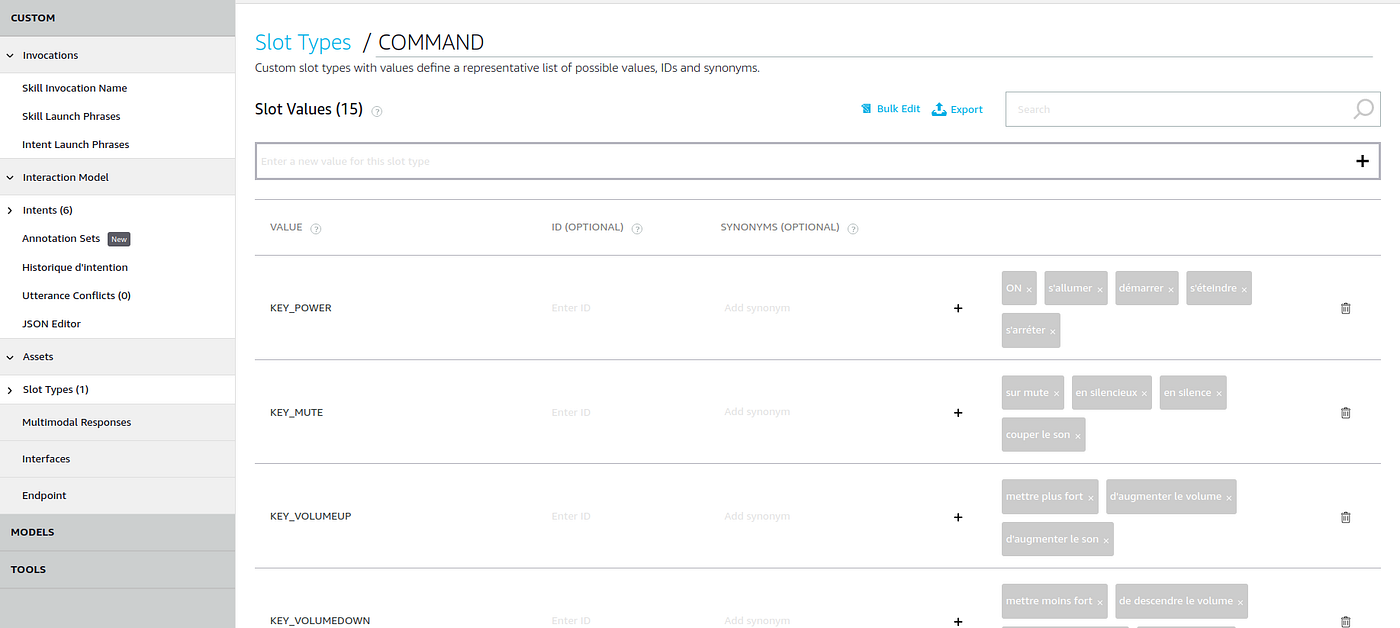
Go to Slot type, name it “command” and recreate the remote keys with conversational values. Example:
KEY_POWER=> ON ; switch on ; switch off ; OFFKEY_VOLUMEUP=> louder the sound; turn up the volume; turn the volume up
Then go to Intent => Add an intent => Add a custom intent and create some utterances including the {command} slot type.
Example of intent: to {command}
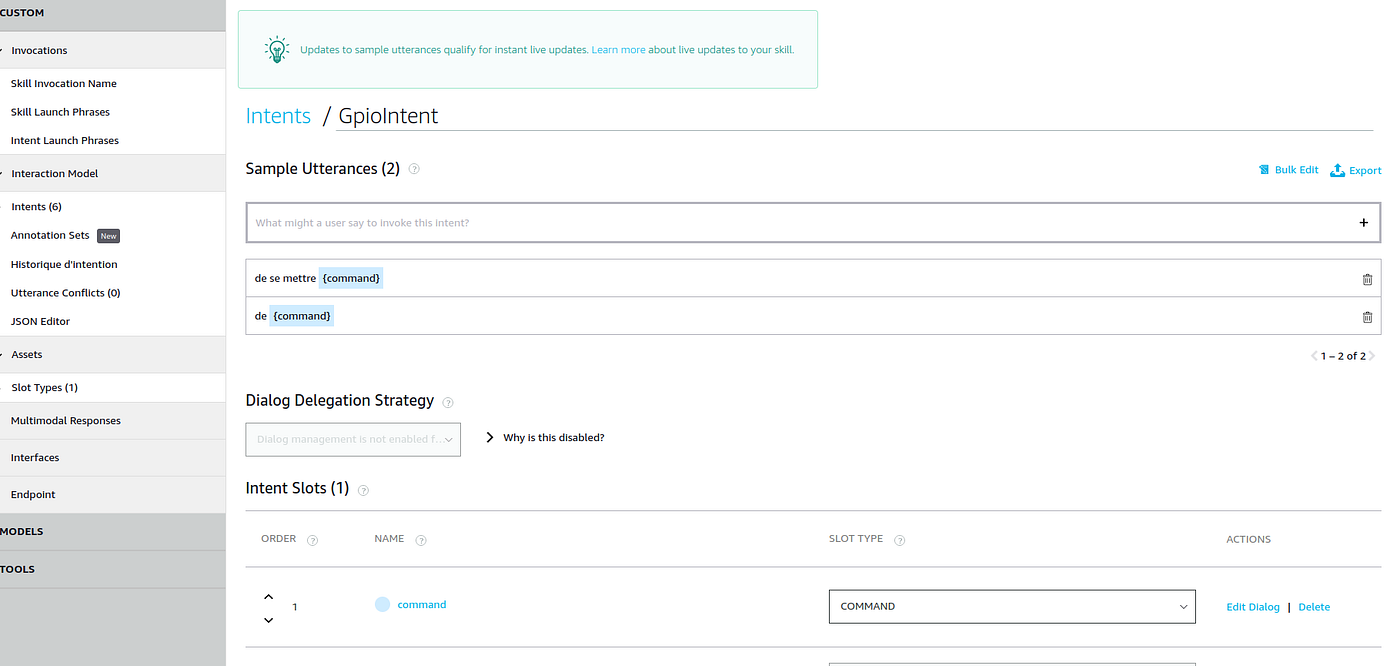
Finally, you need to save and build the model.
Link to your Raspberry
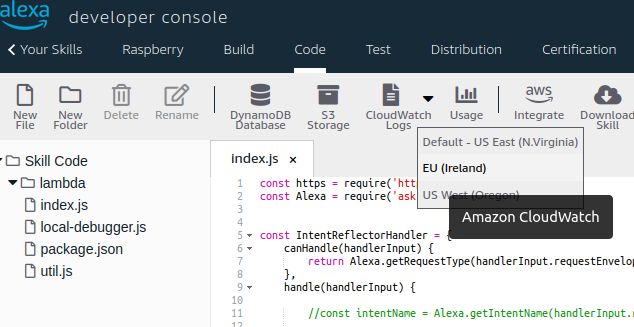
The final step is to modify the Lambda code. Go to “Code” on the top menu.
Lambda is a serverless cloud service from AWS embedded in Alexa.
Here is my minimum code:
const https = require('https')
const Alexa = require('ask-sdk-core');

const IntentReflectorHandler = {
    canHandle(handlerInput) {
        return Alexa.getRequestType(handlerInput.requestEnvelope) === 'IntentRequest';
    },
    handle(handlerInput) {
        const commandkey = handlerInput.requestEnvelope.request.intent.slots.command
            .resolutions.resolutionsPerAuthority[0].values[0].value.name;

        const speakOutput = `You just did the command ${commandkey}`;

        https.get(`https://my_public_api/${commandkey}`, res => {
        }).on('error', err => {
            console.log(err.message);
        });

        return handlerInput.responseBuilder
            .speak(speakOutput)
            .getResponse();
    }
};

const ErrorHandler = {
    canHandle() { return true; },
    handle(handlerInput, error) {
        const speakOutput = 'Sorry, I could not understand the command to send to the TV.';
        console.log(`~~~~ Error handled: ${JSON.stringify(error)}`);
        return handlerInput.responseBuilder
            .speak(speakOutput)
            .getResponse();
    }
};

exports.handler = Alexa.SkillBuilders.custom()
    .addRequestHandlers(IntentReflectorHandler)
    .addErrorHandlers(ErrorHandler)
    .lambda();
The exports.handler shows all public functions that will be launched. Each function has a canHandle check — if false, it’s skipped and the next one in the stack is tried. ErrorHandler has canHandle returning true and is at the bottom of the stack, so it runs as a fallback.
Finally, you can “Deploy” the code to test it. A button “Cloudwatch logs” is also included — it is an AWS managed service that logs all your console.log().
Tips: For France, you probably need to switch to a European AWS Region (small arrow next to the Cloudwatch logs button).
If you’re connected to the same network as your Alexa device, modifications are directly available without extra configuration.
My project including the Node.js server for the Raspberry endpoint, the JSON for Alexa intents and the Node.js Lambda is available on GitHub.